- Home
- Hardware
- SDKs
- Cloud
- Solutions
- Support
- Ecosystem
- Company
- Contact


SDKs & Demos
Found 19 results
- Collapse all
- Expand all
| Title | Body | Platform | Version |
Release Date |
Download |
|---|---|---|---|---|---|
|
ESP8266 RTOS SDK
|
Click the download icon on the right to get release notes in detail and download the SDK of the latest version. |
RTOS SDK | Latest | 2021.04.08 | |
|
ESP8266 NONOS SDK
|
NON-OS SDK | Latest | 2020.06.03 | ||
|
ESP8266 RTOS SDK (IDF Style)
|
ESP8266 RTOS SDK in ESP-IDF style. |
RTOS SDK | V3.1.1 | 2020.03.24 | |
|
ESP8266 NONOS SDK V3.0.0
|
iRAM can be used as memory, thus saving about 17KB memory for user application. |
NON-OS SDK | V3.0.0 | 2018.08.24 | |
|
ESP8266 NONOS SDK V2.2.1
|
ESP8266 non-OS SDK V2.2.1 |
NON-OS SDK | V2.2.1 | 2018.06.08 | |
|
ESP8266 NONOS SDK V2.1.0 20170505
|
ESP8266 Non OS SDK V2.1.0. |
NON-OS SDK | V2.1.0 | 2017.05.05 | |
|
ESP8266 RTOS SDK V1.5.0
|
Added features: 1. SPI flash erase protection mechanism (With this mechanism, boot.bin and current running user.bin cannot be erased.)
2. user_rf_cal_sector_set, an interface the user program MUST have
3. MemLeak debugging feature
4. SNTP support
5. Vendor IE support
6. Weak function wifi_set_backup_mac for setting user MAC
7. mbedTLS support
Improved features: 1. Updated SmartConfig to v2.5.4
2. Updated open freedom to support sending beacon packets
3. Updated libphy.a to v1055
4. Updated secondary bootloader to v1.6
5. Updated esp_init_data_default.bin
6. Optimized socket mechanism
7. Optimized sleep strategy
Fixed problems: 1. lwIP problem
2. PWM problem
3. SPI overlap problem
4. DNS problem with some routers
5. The maximum value of os_timer_arm
6. Exceptional RF failure after external reset;
7. Huawei X4’s failure to connect to Soft-AP
8. A problem in libpp.a that causes system assert
9. System crash when setting opmode from Station to Soft-AP in scan done callback
10. Status error by calling wifi_station_get_connect_status when the password is wrong
11. Disconnect event is prevented from entering twice when calling wifi_station_disconnect.
12. The SPI flash erase / write processes are modified. Before erasing or writing SPI flash, write-protected status will be cleared if need be.
13. Some cases where the RF_Init_data system parameter sector could be corrupted are fixed.
14. Fixed the problem of corrupted system parameter sector due to frequent power-on / power-off.
15. Other bugs. |
RTOS SDK | V1.5.0 | 2016.11.11 | |
|
ESP8266 NONOS SDK V2.0.0 20160810
|
ESP8266_NONOS_SDK_V2.0.0_16_08_10 Release Notes1. Changed the license of some source files to espressif MIT.
2. Updated libphy.a to 1055, fixed an issue of large current in Light-sleep.
3. Updated AT+ to 1.3.0:
3.1 Added Light-sleep wakeup command, AT+WAKEUPGPIO;
3.2 Fixed abnormal AT+CWDHCPS IP allocation;
3.3 Added at_sdio demo under example directory.
4. Fixed probable system default when calling cur and def interfaces.
5. Fixed the issue of high current in Deep-sleep mode without disabling SPI first.
6. Fixed an issue where the SDK would crash when switching from AP to Station mode by calling wifi_set_phy_mode.
7. Updated secondary boot loader to v1.6:
7.1 Supports AT + based on SDIO;
7.2 Supports entering testing mode through GPIO.
8. Added support for MXIC Flash QIO mode.
9. Fixed exception caused during TCP handshake and retransmission.
10. Fixed issues in ESP-NOW.
11. Added ESP-PAIR (Simple-Pair) feature, for APIs please refer to ESP8266 SDK API Guide.
12. wpa2-enterprise time function derivation and time check disable can be set by users.
13. Support for PEAP/TTLS in wpa2-enterprise, for APIs please refer to ESP8266 SDK API Guide.
14. Added mqtt demos under examples directory.
15. Other issue fixes.
16. Resolved an issue that RF_Init_data sector may be broken in stress test. Provided a function user_rf_cal_sector_set which has to be added in application by software developer. More details about user_rf_cal_sector_set refer to documentation "2C-ESP8266__SDK__API Guide". (Resolved in ESP8266_NONOS_SDK_V1.5.4.1)
17. Fix a potential risk that will cause rf not work after external reset. (Resolved in ESP8266_NONOS_SDK_V1.5.4.1)
18. Add SDIO AT support. (Resolved in ESP8266_NONOS_SDK_V1.5.4.1)
19. Fix a potential bug in espconn. (Resolved in ESP8266_NONOS_SDK_V1.5.4.1)
ESP8266_NONOS_SDK Notes: 1. esp_init_data.bin has to be downloaded into flash at least once.
2. Download blank.bin to initialize the sector stored RF_CAL parameter (set by user_rf_cal_sector_set), and download esp_init_data.bin into flash, when the system needs to be initialized, or RF needs to be calibrated again.
AT Notes: 1. Since the release of ESP8266_NONOS_SDK_V1.5.0, AT firmware is too large to use 4Mbit flash. Please choose flash with at least 8Mbit capacity.
2. Firmware upgrade over-the-air process is changed a bit. We will upgrade the latest AT firmware to Espressif Cloud server only after it has been tested and the overall performance is guaranteed.Users may not be able to use AT+CIUPDATE in ESP8266_NONOS_SDK_V1.5.0 and other more advanced versions. |
NON-OS SDK | V2.0.0 | 2016.08.10 | |
|
ESP8266 NONOS SDK V2.0.0 patch 20160809
|
ESP8266_NONOS_SDK_V2.0.0_patch release notes This patch is based on ESP8266_NONOS_SDK_V2.0.0. While using it, users should use .a file in the package to overwrite the corresponding files subject to SDK/lib directory. The updates are as follows: 1. Slow connection problems in some cases have been solved. 2. Provided an interface to enable automatic calibration of frequency offset: void system_phy_freq_trace_enable(bool enable); By default, the automatic calibration of frequency offset is off. To enable it, this function should be called in user_rf_pre_init(). Its parameter is true. Note: Users should confirm that only when ambient temperature is higher than the normal operating temperature range that crystal oscillator requires does this function need to be enabled. In general, this function is not recommended to be enabled if ambient temperature is lower than 80 ℃. |
NON-OS SDK | V2.0.0 | 2016.08.08 | |
|
ESP8266 NONOS SDK MBEDTLS 20160718
|
Features 1. Supports TLS 1.0, TLS 1.1, TLS 1.2, doesn’t support SSL 3.0.
2. TLS cache of 2048 to 8192 bytes.
3. Supports AES-128 and AES-256 encryption algorithm, and CBC mode.
4. Supports SHA-1, SHA-256, SHA-384 and SHA-512 hash algorithm.
5. Supports RSA-512, RSA-1024, RSA-2048 algorithm.
6. Supports certificates in PEM format and DER format.
7. Supports both unidirectional authentication and bidirectional authentication.
8. Supports three-tier certificate chain parsing.
9. Doesn’t support verify three-tier certificate chain with root certificate.
Usage 1. For ESP8266_NONOS_SDK versions older than 2.0.0, copy include, ld and lib folders in the directory of ESP8266_NONOS_SDK_EMBEDTLS to SDK root directory. For version 2.0.0 and later, only the lib folder needs to be copied.
2. “-lssl” in Makefile of user’s project directory should be modified into “-lmbedtls” if the user has utilized libssl.a before. There is no need to modify any user code.
3. mbedtls_demo includes source code of mbedtls, espconn_secure_xxxx APIs and a simple example.
3.1. Copy the entire folder of mbedtls_demoto the SDK root directory.
3.2. Find and run "./make_lib.sh mbedtls" in mbedtls_demo directory. Source code of mbedtls will be automatically compiled and generate libmbedtls.a which will be copied to SDK/lib directory.
3.3. Test firmware of mbedtls_demo can be generated via ./gen_misc.sh. |
NON-OS SDK | MBEDTLS | 2016.07.17 | |
|
ESP8266 NONOS SDK V1.5.3.3 Patch_20160704
|
ESP8266_NONOS_SDK_V1.5.3.3_ Patch is based on the ESP8266_NONOS_SDK_V1.5.3 and contains all changes updated within ESP8266_NONOS_SDK_V1.5.3.1 and ESP8266_NONOS_SDK_V1.5.3.2. When this patch is used, .a files in this patch shall replace corresponding files under the SDK/lib Folder. Updated: 1. Resolved the issue that API system_adc_read may return wrong value. (Resolved in 1.5.3.1)
2. Resolved the issue that the current in light sleep mode is too high. (Resolved in 1.5.3.1)
3. Optimised igmp to resolve the issue that ESP8266 maybe reset if connected to a special router. (Resolved in 1.5.3.1)
4. Resolved an issue that RF_Init_data sector may be broken in stress test. Provided a function “user_rf_cal_sector_set” which has to be added in application by software developer. More details about user_rf_cal_sector_set refer to documentation “2C-ESP8266__SDK__API Guide”.(Resolved in ESP8266_NONOS_SDK_V1.5.3.2)
5. Fix a potential risk that will cause rf not work after external reset.(Resolved in ESP8266_NONOS_SDK_V1.5.3.3)
6. Modify 112 byte of esp_init_data_default.bin, 0x03->0x00, turn off auto freq correction.(Resolved in ESP8266_NONOS_SDK_V1.5.3.3)
Attention: Please refer to “user_main.c” in the zip for “user_rf_cal_sector_set” sample code.
ESP8266_NONOS_SDK Note: 1. esp_init_data.bin has to be downloaded into flash at least once.
2. Download blank.bin to initialize the sector stored RF_CAL parameter (set by user_rf_cal_sector_set), and download esp_init_data.bin into flash, when the system needs to be initialized, or RF needs to be calibrated again.
|
NON-OS SDK | V1.5.3.3 | 2016.07.04 | |
|
ESP8266 NONOS SDK V1.5.2.1 Patch_20160704
|
This patch is based on the ESP8266_NONOS_SDK_V1.5.2. When this patch is used, .a files in this patch shall replace corresponding files under the SDK/lib Folder. Updated: 1. Resolved an issue that RF_Init_data sector may be broken in stress test. Provided a function “user_rf_cal_sector_set” which has to be added in application by software developer. More details about user_rf_cal_sector_set refer to documentation “2C-ESP8266__SDK__API Guide”.(Resolved in ESP8266_NONOS_SDK_V1.5.2.1)
2. Fix a potential risk that will cause rf not work after external reset.(Resolved in ESP8266_NONOS_SDK_V1.5.2.1)
3. Modify 112 byte of esp_init_data_default.bin, 0x03->0x00, turn off auto freq correction.(Resolved in ESP8266_NONOS_SDK_V1.5.2.1)
Attention: Please refer to “user_main.c” in the zip for “user_rf_cal_sector_set” sample code.
ESP8266_NONOS_SDK Note: 1. esp_init_data.bin has to be downloaded into flash at least once.
2. Download blank.bin to initialize the sector stored RF_CAL parameter (set by user_rf_cal_sector_set), and download esp_init_data.bin into flash, when the system needs to be initialized, or RF needs to be calibrated again. |
NON-OS SDK | V1.5.2.1 | 2016.07.04 | |
|
ESP8266 NONOS SDK V1.5.4.1 Patch_20160704
|
This patch is based on the ESP8266_NONOS_SDK_V1.5.4. When this patch is used, .a files in this patch shall replace corresponding files under the SDK/lib Folder. Updated: 1. Resolved an issue that RF_Init_data sector may be broken in stress test. Provided a function “user_rf_cal_sector_set” which has to be added in application by software developer. More details about user_rf_cal_sector_set refer to documentation “2C-ESP8266__SDK__API Guide”. (Resolved in ESP8266_NONOS_SDK_V1.5.4.1)
2. Fix a potential risk that will cause rf not work after external reset. (Resolved in ESP8266_NONOS_SDK_V1.5.4.1)
3. Fix system state mismatch when call some cur and def APIs. (Resolved in ESP8266_NONOS_SDK_V1.5.4.1)
4. Add SDIO AT support. (Resolved in ESP8266_NONOS_SDK_V1.5.4.1)
5. Fix a potential bug in espconn. (Resolved in ESP8266_NONOS_SDK_V1.5.4.1)
6. Modify 112 byte of esp_init_data_default.bin, 0x03->0x00, turn off auto freq correction.(Resolved in ESP8266_NONOS_SDK_V1.5.4.1)
Attention: Please refer to “user_main.c” in the zip for “user_rf_cal_sector_set” sample code.
ESP8266_NONOS_SDK Note: 1. esp_init_data.bin has to be downloaded into flash at least once.
2. Download blank.bin to initialize the sector stored RF_CAL parameter (set by user_rf_cal_sector_set), and download esp_init_data.bin into flash, when the system needs to be initialized, or RF needs to be calibrated again. |
NON-OS SDK | V1.5.4.1 | 2016.07.04 | |
|
ESP8266 RTOS SDK v1.3.3 Patch_20160704
|
This patch is based on the ESP8266_RTOS_SDK_V1.3.0(68c9e7b4) and contains all changes updated within ESP8266_RTOS_SDK_V1.3.1(095c975c) and ESP8266_RTOS_SDK_V1.3.2(86e315aa). When this patch is used, .a files in this patch shall replace corresponding files under the SDK/lib Folder. Updated: 1. Fix station leave issue in softap mode.(Resolved in ESP8266_RTOS_SDK_V1.3.1)
2. Resolved an issue that RF_Init_data sector may be broken in stress test. Provided a function “user_rf_cal_sector_set” which has to be added in application by software developer. More details about user_rf_cal_sector_set refer to documentation “2C-ESP8266__SDK__API Guide”.(Resolved in ESP8266_RTOS_SDK_V1.3.2)
3. Fix a potential risk that will cause rf not work after external reset.(Resolved in ESP8266_RTOS_SDK_V1.3.3)
4. Modify 112 byte of esp_init_data_default.bin, 0x03->0x00, turn off auto freq correction.(Resolved in ESP8266_RTOS_SDK_V1.3.3)
Attention: Please refer to “user_main.c” in the zip for “user_rf_cal_sector_set” sample code.
ESP8266_RTOS_SDK Note: 1. esp_init_data.bin has to be downloaded into flash at least once.
2. Download blank.bin to initialize the sector stored RF_CAL parameter (set by user_rf_cal_sector_set), and download esp_init_data.bin into flash, when the system needs to be initialized, or RF needs to be calibrated again. |
RTOS SDK | V1.3.3 | 2016.07.04 | |
|
ESP8266 RTOS SDK v1.4.2 Patch_20160704
|
This patch is based on the ESP8266_RTOS_SDK_V1.4.0(cb4060d9) and contains all changes updated within ESP8266_RTOS_SDK_V1.4.1(5377c409). When this patch is used, .a files in this patch shall replace corresponding files under the SDK/lib Folder. Updated: 1. Resolved an issue that RF_Init_data sector may be broken in stress test. Provided a function “user_rf_cal_sector_set” which has to be added in application by software developer. More details about user_rf_cal_sector_set refer to documentation “2C-ESP8266__SDK__API Guide”.(Resolved in ESP8266_RTOS_SDK_V1.4.1)
2. Fix a potential risk that will cause rf not work after external reset.(Resolved in ESP8266_RTOS_SDK_V1.4.2)
3. Modify 112 byte of esp_init_data_default.bin, 0x03->0x00, turn off auto freq correction.(Resolved in ESP8266_RTOS_SDK_V1.4.2)
Attention: Please refer to “user_main.c” in the zip for “user_rf_cal_sector_set” sample code.
ESP8266_RTOS_SDK Note: 1. esp_init_data.bin has to be downloaded into flash at least once.
2. Download blank.bin to initialize the sector stored RF_CAL parameter (set by user_rf_cal_sector_set), and download esp_init_data.bin into flash, when the system needs to be initialized, or RF needs to be calibrated again. |
RTOS SDK | V1.4.2 | 2016.07.04 | |
|
ESP8266 NONOS SDK V1.5.4
|
Updated: 1. Updated libphy.a to version 972.
2. Updated libpp.a to version 10.1.
3. Optimized IGMP function.
4. Optimized DNS function.
5. Optimized WPS function.
6. Optimized DHCP server function. |
NON-OS SDK | V1.5.4 | 2016.05.20 | |
|
ESP8266 NONOS SDK V1.5.3
|
Updated: 1. Supported ISSI flash.
2. SmartConfig updated to version 2.5.4, solved the issue that AirKiss may fail in certain cases.
3. AT updated to version 1.00.
4. Added lwip_open_src_template_proj in ESP8266_NONOS_SDK\examples for open source LWIP.
5. Added SPI driver, refer to ESP8266_NONOS_SDK\driver_lib\driver\spi_interface.c.
6. Removed the limitation of freedom sending unencrypted beacon/probe req/probe resp. |
NON-OS SDK | V1.5.3 | 2016.04.18 | |
|
ESP8266 RTOS SDK v1.4.0
|
Updated: 1. Update boot.bin to v1.5; 2. Add wifi_station_set/get_hostname API; 3. Update SmartConfig to version 2.5.3; 4. Support GPIO wakeup; 5. Enable IGMP in LWIP; 6. Add espconn_init in espconn.h; 7. Update esp_init_data_default.bin; 8. IROM start address changed to 0x20000. |
RTOS SDK | V1.4.0 | 2016.02.26 | |
|
ESP8266 IOT Platform
|
A demo that should be run with ESP8266 RTOS SDK. This is the Initial version. |
RTOS | V1.0 | 2015.09.18 |
APKs
Found 12 results
- Collapse all
- Expand all
| Title | Body | Platform | Version |
Release Date |
Download |
|---|---|---|---|---|---|
|
ESP SoftAP Provisioning for iOS
|
IOS | V2.1.0 | 2022.10.08 | ||
|
ESP BLE Provisioning for iOS
|
IOS | V2.1.0 | 2022.10.08 | ||
|
ESP SoftAP Provisioning for Android
|
Android | V2.0.13 | 2022.10.07 | ||
|
ESP BLE Provisioning for Android
|
Android | V2.0.13 | 2022.10.07 | ||
|
ESP-TOUCH for Android
|
Make device connect to AP |
Android | V2.0.0 | 2021.02.08 | |
|
ESP-Drone for iOS
|
IOS | V1.0.1 | 2020.07.20 | ||
|
ESP-BluFi for iOS
|
BluFi for iOS |
IOS | V1.2.0 | 2020.07.19 | |
|
ESP-Drone for Android
|
Android | V0.7.3 | 2020.07.14 | ||
|
ESP-MESH for Android
|
Android App for ESP-MESH Smart Light |
Android | V1.2.3 | 2020.05.29 | |
|
ESP-TOUCH for iOS
|
ESP-TOUCH for iOS |
IOS | V2.0.0 | 2020.04.20 | |
|
ESP-BluFi for Android
|
Configure BluFi device |
Android | V1.5.3 | 2020.03.26 | |
|
ESP-MESH for iOS
|
IOS | V1.1.1 | 2019.12.20 |
Tools
Found 10 results
- Collapse all
- Expand all
| Title | Body | Platform | Version |
Release Date |
Download |
|---|---|---|---|---|---|
|
Flash Download Tools
|
Windows PC | V3.9.6 | 2024.04.11 | ||
|
ESP Series Chips WFA Certification and Test Guide
|
This guide provides instructions for obtaining WFA certificates for ESP series chips, along with QuickTrack for Espressif clients seeking certification for their products. |
Windows PC | V1.0 | 2023.11.16 | |
|
ESP RF Test Tool and Test Guide
|
Quickly get Espressif's RF performance test tool, test firmware, test guide and certification test guide for ESP32, ESP32-C3, ESP32-S2,ESP32-C6,ESP32-C2,ESP32-H2, and ESP8266 series of product. |
ZIP | V3.6 | 2023.10.13 | |
|
ESP8266 FOTA Demonstration with Phone App
|
This guide demonstrates the FOTA (Firmware-Over-The-Air) function for ESP8266-based devices. In particular, the guide outlines the process of upgrading ESP8266 firmware from Espressif Cloud over Wi-Fi by using our Android app. This process requires no technical skills and does not involve a PC or UART based tools. Therefore this process can be carried out by any user, including end users of ESP8266 based products. The FOTA test has been demonstrated and run on the ESP-Launcher, an ESP8266 evaluation board designed by Espressif. However, with appropriate build settings based on your application flash configuration, the test can be made to run on any ESP8266 based system. |
ZIP | V1.0 | 2016.10.23 | |
|
ESP8266 FOTA Demonstration
|
Espressif provides guidelines and a sample implementation of FOTA (Firmware Over-The-Air) function to upgrade the firmware on devices powered by the ESP8266. ESP8266 device will download a new version of firmware from the update server over Wi-Fi and run it. This guide is intended to help you run a FOTA demonstration on the ESP8266 easily and quickly, with a PC acting as the local update server. The FOTA test has been demonstrated and run on the ESP-Launcher, an ESP8266 evaluation board designed by Espressif. However, with appropriate build settings based on your application flash configuration, the test can be made to run on any ESP8266-based system. The demonstration initially runs the user1.bin as the primary firmware. The user1.bin, when executed, connects to the update server and downloads user2.bin (updated firmware) into the flash memory. When a system restart is triggered, the ESP8266 boots into the updated user2.bin, which now becomes the primary firmware binary file until another update is available for download. This new update is downloaded as user1.bin. This cycle is repeated for every subsequent update. |
ZIP | V1.0 | 2016.10.11 | |
|
TCP/UDP UART Passthrough Test Demonstration
|
The UART passthrough mode has been provided with the AT firmware to facilitate sending of data blocks of large size and for continuous transmission of small packets of data. In the passthrough mode, the data sent by the main application processor is directly forwarded to the target networking device via a TCP or UDP connection. Here, the ESP8266 AT firmware handles the networking tasks involved. This guide is intended to help users run TCP & UDP passthrough test on the ESP8266 IOT Platform quickly to evaluate the feature with various networking configurations of the ESP8266. |
ZIP | V1.0 | 2016.10.10 | |
|
ESP-Launcher Data Send and Receive Operation Power Consumption Tests
|
The power consumption of the ESP8266 depends on the PHY mode employed for sending or receiving data. In power critical applications, it is important to balance the average or burst data transfer rate as well as overall power consumption of the system.This test demonstration is intended to demonstrate the results of various power consumption tests on the ESP8266. Based on this guide, users can choose the appropriate PHY mode and data transmission scheme for their application. |
ZIP | V1.0 | 2016.10.10 | |
|
ESP8266 Low Power Test Demonstration
|
This guide is intended to help implement and test the available low power modes and observe the resulting current consumption of the ESP8266 easily and quickly. It demonstrates the Modem-sleep mode, Light-sleep mode, and Deep-sleep mode. |
ZIP | V1.0 | 2016.09.29 | |
|
ESP8266 Ping Test Demonstration
|
This guide is intended to help users run ping test on the ESP8266 easily and quickly. It demonstrates the testing of network connectivity by running ping test in Station mode or SoftAP mode of ESP8266. The ping test has been demonstrated and run on the ESP-Launcher. However, with appropriate build settings, the test can be made to run on any ESP8266-based system. |
ZIP | V1.0 | 2016.09.27 | |
|
ESP8266 Add Low-power Cmd
|
Provides low-power command added to binaries. |
Python | V2.0 | 2016.04.27 |
FAQ
- Collapse all
- Expand all
Application
How do I generate user1.bin and user2.bin?
You may run gen_mish.sh in terminal to generate the files user1.bin and user2.bin separately. The steps are:
- Compile user1.bin using correct Flash and boot settings.
- Do a “make clean”, which clears temporary files generated in the first step. Compile user2.bin, ensure that you use the same options that you used to generate user1.bin.
Why does OTA use two binary files? Are “user1.bin” and “user2.bin” different?
Yes, user1.bin and user2.bin are two different files. They must be generated with the same flash/boot configuration for OTA to work properly. The two different binary files are required because user1.bin can download user2.bin and similarly, user2.bin can download user1.bin during OTA. This ensures that the upgrade process does not cause corruption of the main binary file in case of power failure during upgrade.
OTA failed, what could be the reasons?
There could be many common reasons for OTA failure. We recommend referring to the document ESP8266 FOTA Guide before you use the FOTA APIs.
Here are some quick checklist to troubleshoot OTA failure:
- Make sure that you select the correct Flash size when downloading the firmware to Flash.
- The first time you download a new firmware, always also download blank.bin.
- Confirm that user1.bin and user2.bin (optional) downloaded to the correct locations.
- Make sure you generate user1.bin and user2.bin with the same Flash/boot configuration options!
How do I provide updates through my own server?
If you want to serve OTA updates through your own server, you must make sure that the server can understand and respond to firmware upgrade requests.
The update request process can be outlined as follows:
- Sent HEAD to cloud, requesting BIN length. Server responds with HTTP package (with BIN length information included in the HTTP HEAD).
- Based on the BIN length information thus obtained, erase ESP8266’s Flash sectors to be upgraded with API (spi_flash_erase_sector).
- Sent GET request to obtain the BIN file from the server. The erased area can then be programmed with the new BIN file.
Can I set up my own cloud server for serving updates for ESP8266 devices?
Users can serve updates via their own custom server. The server should be able to serve HTTP requests and should have device control features.
For API reference, please visit: http://iot.espressif.cn/#/api-en/.
How will the ESP8266 communicate with the cloud server?
Standard HTTP protocol may be used to connect to the update server. For example, when your custom server is running, when the ESP8266 device starts a socket and sends HTTP request:
| GET /your-bin-file-path.bin HTTP/1.1 Host: yourdomain.com Connection: keep-alive Cache-Control: max-age=0 Accept: text/html,application/xhtml+xml,application/xml;q=0.9,image/webp,*/*;q=0.8 User-Agent: Mozilla/5.0 (X11; Linux x86_64) AppleWebKit/537.36 (KHTML, like Gecko) Chrome/39.0.2171.95 Safari/537.36 Accept-Encoding: gzip, deflate, sdch Accept-Language: en-US,en;q=0.8,ja;q=0.6,zh-CN;q=0.4,zh-TW;q=0.2 |
Note that the HTTP protocol specifies that requests end with “\r\n\r\n”, therefore please do not use this combination in between the entire request phrase.
You may debug your server by using telnet with
| telnet <sitename> <port_number> |
However, make sure that telnet is enabled on your PC before using this command. You may also use standard terminal emulators such as TeraTerm that support telnet.
Why does SmartConfig fail?
Here are some probable reasons why SmartConfig might fail:
- APP version is not matched with SDK or SmartConfig version.
- The router under configuration is a 5 GHz-only router.
- Some other API was called during SmartConfig (please do not call any APIs under SmartConfig is done).
- When using AT command, do not stop SmartConfig before device gets IP from router.
If the above did not solve your problem, please send us the debug log so that we can analyze the problem.
What is the corresponding version of APP or SDK for a given version of SmartConfig?
If the API smartconfig_start() is called by the user, “SC version: vX.X.X” will be printed out for reference. The related SDK and APP versions for SmartConfig versions are listed below:
| sdk v1.2.0 | smartconfig v2.4 | app v0.3.4.x |
| sdk v1.3.0 | smartconfig v2.5 | app v0.3.4.x |
| sdk v1.3.0 | smartconfig v2.5.1 | app v0.3.4.x |
| sdk v1.4.0 | smartconfig v2.5.2 | app v0.3.4.x |
| sdk v1.5.0 | smartconfig v2.5.3 | app v0.3.4.x |
| sdk v1.5.4 | smartconfig v2.5.4 | app v0.3.4.x |
Does ESP8266 support HTTP hosting?
Yes, it does. ESP8266 can run as a server in both SoftAP and Station modes.
- When running as a server in SoftAP mode, clients can directly access the ESP8266 host or server at 192.168.4.1 (default) IP address.
- When the server is accessed via a router, the IP address should be the one allocated to the ESP8266 by the router.
- When using SDK to write native code, please use espconn structure and related APIs.
- When using AT commands, start a server using AT+CIPSERVER command.
How do I transmit HTTP packets using AT commands?
1. Use AT command to configure SoftAP + Station mode: AT+CWMODE=3 // set softAP+station mode
2. Use AT command to connect to the router: AT+CWJAP="SSID","password" // ESP8266 station connect to router
3. Create a TCP connection and transmit data according to the HTTP packet format, as shown in the figure below. Please note that the line feed characters [(0x0d 0x0a) or (CR LF)] are essential for line termination and must NOT be left out.
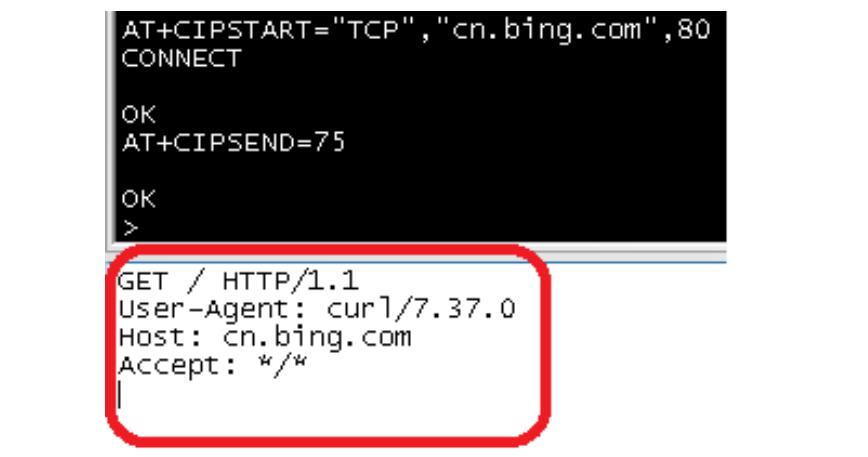
4. Receive the returned message from HTTP packets.

How do I define my own functions in AT+ set and how to pass variables between them?
There is an example of how to define an AT command “AT+TEST” in AT demo folder of Non-OS SDK (\ESP8266_NONOS_SDK\examples\at\user\user_main.c). The structure at_funcationType is used to define the four variants of an AT command. We use command “AT+TEST” as an example and demonstrate how it can be implemented.
- Type at_testCmd: Test command in the format of AT+TEST=?. In AT demo, the registered callback is at_testCmdTest. The test demand could be programmed to return the range of the parameter value. If at_testCmd is registered as NULL, it will not be implemented.
- Type at_queryCmd: Query command in the format of AT+TEST=?. In AT demo, the registered callback is at_queryCmdTest. The test demand could be programmed to return the current value. If at_queryCmdTest is registered as NULL, it will not be implemented.
- Type at_setupCmd: Setup command in the format of AT+TEST=parameter1,parameter2,……,. In AT demo, the registered callback is at_setupCmdTest. The setup command can be programmed to set the parameter value. If at_setupCmdTest is registered as NULL, it will not be implemented.
- Type at_exeCmd: Execution command in the format of AT+TEST. In AT demo, the registered callback is at_exeCmdTest. The execution command can be programmed to execute an operation. If at_exeCmdTest is registered as NULL, it will not be implemented.
Where does the Product ID used in the near field of WeChat come from?
Users need to establish a device ID. For example, device ID=1234 needs to be established for a device using a client’s WeChat account. Use the following command:
|
curl -q “https://api.weixin.qq.com/cgi-bin/token? grant_type=client_credential&appid=wx0f74f861897f84b5&secret=your_We Chatname_32characters_please” |
//Note: This is to obtain the access token.
(“your_WeChatname_32characters_please” represents the client’s WeChat API App Secret, which can be acquired through application and should be 32 characters long.).
Return:
|
{"access_token":"L2_2V1E98Vk- jTXenXDZjDT0GaudUn_VGTRa7O98hdfT0lTZa2B7nj6YvXN01gssQa3ZraRgjALuCvxd -SamuPR885KJabaw1EYLA0kns-Yglr4ryolEhHb- QcnWMaNqSEDjACANZY","expires_in":7200} |
|
curl -d '{"device_num":"1","device_list":[{"id":"1234","mac":"18fe3497d500","connect_protocol":"4","auth_key":"00000000000000000000000000000000", "close_strategy":"1","conn_strategy":"1","crypt_method":"0","auth_ver":"0","manu_mac_pos":"-2","ser_mac_pos":"-2"}], "op_type":"0", "product_id": 5157}' "https://api.weixin.qq.com/device/authorize_device?access_token=L2_2V1E98Vk-jTXenXDZjDT0GaudUn_VGTRa7O98hdfT0lTZa2B7nj6YvXN01gssQa3ZraRgjALuCvxd-SamuPR885KJabaw1EYLA0kns-Yglr4ryolEhHb-QcnWMaNqSEDjACANZY" |
//Note: Establish the device ID=1234.
Next, the AT command needs to be used:
AT+CWSTARTDISCOVER=“gh_9e2cff3dfa51”,”1234”,1. (In “gh_9e2cff3dfa51”, “9e2cff3dfa51” is your WeChat official account.)
How to define a custom AT command in ESP8266 and what is the length limit for it?
Users can add customized AT command based on ESP8266’s own AT commands, by using ESP8266_NONOS_SDK\examples\at sample code. The maximum string length of AT command supported by SDK is 128 bytes (including terminator “\r\n”). The length of AT command and parameters are not individually limited.
For example,
AT+CMDTEST=param1,param2,param3,….paramN\r\n
strlen(“AT+CMDTEST=param1,param2,param3,....paramN\r\n”)<=128 Bytes
For details of SDK please refer to ESP8266 SDKs & Demos.
To what location should I download eagle.irom0.text.bin if my application uses non-FOTA firmware?
For both Non-OS SDK and RTOS SDK, the location of firmware binary files is determined by the contents of the appropriate linker script. In case of non-FOTA firmware, the user code is contained in eagle.irom0.text.bin. The location of this binary file in flash is determined by the linker script eagle.app.v6.ld located in SDK/ld.
Note that the default location of eagle.irom0.text.bin is NOT the same across all versions of ESP8266 SDK. You can determine the flash address for your SDK version as follows:
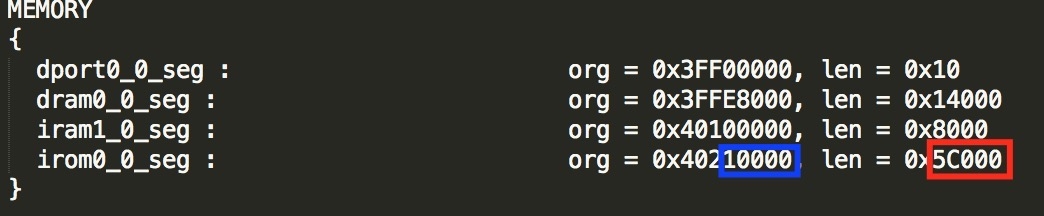
The address marked in blue is the flash address of eagle.irom0.text.bin. In this example, it is 0x10000.
Peripherals
What are the specifications for the internal ADC of ESP8266?
Channel: 1
Sampling rate:
100k samples/sec (Wi-Fi modem turned off)
1k samples/sec (Wi-Fi modem normally active)
Resolution: 12-bit (10-bit read by system_adc_read())
What are the bitmap and register information for the internal ADC of ESP8266?
The ADC is closely integrated with the internal RF circuitry and therefore, the bitmap and register information may not be available for open use. We are sorry for the inconvenience. Feel free to contact us for any specific information.
How accurate is the internal ADC?
When connected to routers, ESP8266 will enter modem_sleep in STA mode only, which will cause the changes of the internal chip currents and reference values, and thus result in abnormal ADC sampling.
If a high accuracy is required, please use system_adc_fast_read API. But RF circuitry should be shut down before measuring and Wi-Fi will be disconnected. For an relatively lower accuracy when readings’ difference of 1 or 2 can be tolerated, Wi-Fi can be configured to non_sleep mode.
For lower accuracy, the user may enter sleep mode. Power consumption is lower in this case.
What should I use the internal ADC for?
The internal ADC can be used for temperature sensing or sensing approximate current drawn by external devices. Note that because the ADC readings are prone to noise, it should only be used for applications where high accuracy is not required. For example, thermal cut-off mechanisms, etc.
What are the parameters for the function set_tx_data (u8 tx_addr, u8 tx_cmd, u8 tx_rep)?
tx_addr is the sending address;
tx_cmd is the sending command;
tx_rep is the repeating time.
Why are there Illegible symbols on UART when booting up? How do I change the baud rate?
With a 26 MHz crystal oscillator, the ESP8266 baud rate on power-up defaults to 74880 for UART0. This might be the reason for illegible characters on power-up.
Users can change the UART configuration in user_main(). For example, change the baud rate as follows:
void ICACHE_FLASH_ATTR
uart_init(UartBautRate uart0_br, UartBautRate uart1_br)
{
// rom use 74880 baut_rate, here reinitialize
UartDev.baut_rate = uart0_br;
uart_config(UART0);
UartDev.baut_rate = uart1_br;
uart_config(UART1);
}
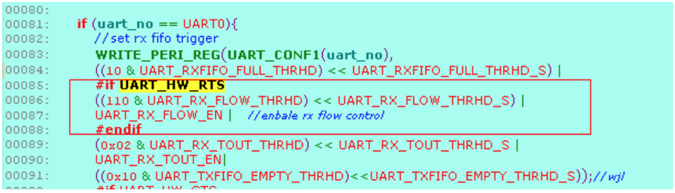
How do I enable UART flow control?
- For configuring data format of UART communication, please refer to file uart.c in SDK/driver_lib/driver/.
- The two steps to configure hardware flow control in UART communication are as follows:
(1) Set the following attribute to 1 in uart.h:
#define UART_HW_RTS 1 //set 1: enable uart hw flow control RTS, PIN MTDO, FOR UART0
#define UART_HW_CTS 1 //set1: enable uart hw flow contrl CTS , PIN MTCK, FOR UART0
(2) Configure hardware flow control threshold.
The threshold of hardware flow control is highlighted by the red square in the following screenshot. When the number of bytes in RXFIFO is larger than 110, RTS will be pulled to logic high.
How to use UART1 to print data?
The UART1 only features a TxD pin to output log data alternatively when the primary UART0 is used for other applications.
Refer to the following code example to configure UART1:
void ICACHE_FLASH_ATTR
uart_init_new(void)
{
// Wait for FIFOs to be emptied
UART_WaitTxFifoEmpty(UART0);
UART_WaitTxFifoEmpty(UART1);
// Configure UART settings
UART_ConfigTypeDef uart_config;
uart_config.baud_rate = BIT_RATE_74880;
uart_config.data_bits = UART_WordLength_8b;
uart_config.parity = USART_Parity_None;
uart_config.stop_bits = USART_StopBits_1;
uart_config.flow_ctrl = USART_HardwareFlowControl_None;
uart_config.UART_RxFlowThresh = 120;
uart_config.UART_InverseMask = UART_None_Inverse;
UART_ParamConfig(UART0, &uart_config);
UART_IntrConfTypeDef uart_intr;
uart_intr.UART_IntrEnMask = UART_RXFIFO_TOUT_INT_ENA | UART_FRM_ERR_INT_ENA | UART_RXFIFO_FULL_INT_ENA;
uart_intr.UART_RX_FifoFullIntrThresh = 100;
uart_intr.UART_RX_TimeOutIntrThresh = 2;
uart_intr.UART_TX_FifoEmptyIntrThresh = 20;
UART_IntrConfig(UART0, &uart_intr);
// Set UART1 for printing
UART_SetPrintPort(UART1);
// Register interrupt handler
UART_intr_handler_register(uart0_rx_intr_handler);
ETS_UART_INTR_ENABLE();
}
Does the hardware SDIO interface support SD cards?
Please note that the SDIO hardware only supports the device or slave profile, i.e. it cannot act as a host to control SDIO devices such as SD cards.
What is the maximum speed supported by the SDIO interface?
The maximum clock speed supported by the hardware SDIO slave module is 50 MHz. As SDIO specifies use of quad data lines, the effective maximum bit rate is 200 Mbps.
LED connected to GPIO blinks once upon power-on - why is this happening?
Whether the problems happens or not depends on the design of the LED driver. If the LED is powered on low level and IO is pulled to a logic low upon power-on, then the LED may blink. The reason is that except GPIO4 and GPIO5 related to Flash, pull-ups for all IO pins are enabled.
Solution:
- Disable pull-ups in user_init upon power-on.
- If the first method doesn’t work, please contact us to obtain a customized boot.bin file. IO pull-ups will be disabled when boot.bin is loaded into RAM, which is earlier than when user.bin is called.
Why is there a small spike when PWM is started?
Note that the PWM is generated by software and the small peak may be seen as a measure of the resolution PWM can achieve. In high accuracy mode, the resolution can be up to 22222 counts. However, the duty cycle can never be 100%.
Why is the PWM duty cycle transitioning slowly?
If you use the soft change APIs found in the SDK demo, such as light_set_aim and light_set_aim_r, these APIs are optimized for lighting applications and therefore cause smooth transitions.
For changing the PWM quickly for other applications, please use pwm_set_duty to set the duty cycle desired and call pwm_start to implement new duty cycle immediately.
Are the GPIO pins 5V compatible?
No, they are not. While many applications may get away by using a resistor voltage divider or series resistor, we highly recommend using a proper logic level converter chip to interface with 5V logic. Not doing so may lead to damage to the ESP8266 in the long run.
Where can I find the register descriptions and bitmap of the GPIO registers?
Please find the GPIO pin list and register description here:
How do I program the GPIO?
Here are two examples of GPIO operations.
For the Non-OS SDK, for example, configure input to MTDO and configure it to falling-edge-triggered mode:
void ICACHE_FLASH_ATTR gpio_init(void)
{
//GPIO Alternate Function
PIN_FUNC_SELECT(PERIPHS_IO_MUX_MTDO_U,FUNC_GPIO15);
GPIO_DIS_OUTPUT(GPIO_ID_PIN(15));
//Configure it in input mode.
ETS_GPIO_INTR_DISABLE();
//Close the GPIO interrupt
//Register the interrupt function
ETS_GPIO_INTR_ATTACH(GPIO_INTERRUPT,NULL);
gpio_pin_intr_state_set(GPIO_ID_PIN(15),GPIO_PIN_INTR_NEGEDGE);
//Falling edge trigger
ETS_GPIO_INTR_ENABLE() ;
//Enable the GPIO interrupt
}
For the RTOS SDK:
{
GPIO_ConfigTypeDef gpio_in_cfg;
//Define GPIO Init Structure
gpio_in_cfg.GPIO_IntrType = GPIO_PIN_INTR_NEGEDGE;
//Falling edge trigger
gpio_in_cfg.GPIO_Mode = GPIO_Mode_Input;
//Input mode
gpio_in_cfg.GPIO_Pin = GPIO_Pin_15;
// Enable GPIO
gpio_config(&gpio_in_cfg);
//Initialization function
GPIO_REG_WRITE(GPIO_STATUS_W1TC_ADDRESS,
BIT(GPIO_UART_IN_NUM));
gpio_intr_handler_register(interrupt_GPIO_UART);
// Register the interrupt function
_xt_isr_unmask(1 << ETS_GPIO_INUM);
//Enable the GPIO interrupt
}
Note that there may be slight differences in the code for RTOS and Non-OS applications for programming the same functionalities.
What is the buffer size on HSPI? What are the highlight features?
The data buffer on the HSPI peripheral is 16 words (or 64 bytes). It is word accessible and is a continuous block on the memory map. The buffer is very flexible in the manner that the data contained can be transmitted LSB or MSB first and also in little-endian or big-endian fashion, which eliminates the need for software manipulation of data block sequence. With the HSPI buffer employed, the channel utilization can exceed 90% at moderate clock speeds.
How can the HSPI be used optimally when multiple devices are connected to the port?
Unlike I2C interface, the HSPI clock speed need NOT be slower than the slowest member of the network. The speed can be dynamically configured according to the currently active peripheral.
The pin HSPI_CS0 can be attached to the HSPI interface and can be controlled automatically. This should be used when devices such as LCDs are used, that require CS line activity frequently.
Please use source termination resistors when interfacing to a very high speed peripheral.
How to enable the entire 64 bytes of HSPI data buffer?
Use
CLEAR_PERI_REG_MASK(SPI_USER(spiNum), SPI_USR_MISO_HIGHPART );
to enable the upper part of the data buffer to be used for data transfer.
How do I configure (H)SPI module for data transfer?
Please refer to example/peripheral_test for Non-OS SDK.
Which APIs will write or save data to the flash memory?
wifi_station_set_auto_connect
wifi_station_ap_number_set
wifi_set_phy_mode
wifi_softap_set_config
wifi_station_set_config
wifi_set_opmode
system_restart_enhance
system_restore
system_upgrade_reboot
How is the system parameter area organized?
The last 3 sectors of the primary Flash memory are designated as the system parameter area. The first 2 sectors are copies (so that at least one copy is safe just in case power fails when writing to one sector). The last sector is used to save the flag to determine which of the first 2 sectors to use. This mechanism ensures that important configuration data is never corrupted due to power failure during erase/write operations.
Can data be read/written freely at any address of the Flash memory?
No, all read/write operations must be aligned to the 4-byte (word) boundary. We highly recommend performing operations on blocks, instead of frequent, small data operations.
Can the same flash read/write code work on all ESP8266 devices?
Please note that the flash memory is separate and is connected to the ESP8266 in the circuit. If your code is being run by systems with different flash memory configurations, note that the initial downloading of firmware is done by selecting the correct flash size. Also, it is the responsibility of the code to determine the Flash address range and not write/read the addresses that are not available.
For example, for a flash size of 8 Mbit, read/write over 0x100000 is not a valid operation.
Is there an example of flash testing routine?
Here is an example of flash texting routine:
uint32 sector is start sector, and uint32 cnt is sector count to erase.
#define FLASH_WRITE_LEN_BYTE (1024*4)
#define FLASH_WRITE_CONTENT (0X10)
void flash_sector_rw_test(uint32 sector,uint32 cnt)
{
char* w_data=(char*)os_malloc(FLASH_WRITE_LEN_BYTE);
uint32 flash_operate=0;
uint32 i=0;
uint8 status=0;
os_printf("Test Sector is 0x%x\n",sector);
if(NULL==w_data){
os_printf("Memory little\n");
return;
}
os_memset(w_data,FLASH_WRITE_CONTENT,FLASH_WRITE_LEN_BYTE);
for(i=0;i<cnt;i++){
if(spi_flash_erase_sector(sector+i)==0)
{
os_printf("erase sector0x%x ok\n",sector+i);
}
else{
os_printf("Err:erase sector0x%x err\n",sector+i);
}
}
for(i=0;i<cnt;i++){
if(spi_flash_write((sector+i)*(FLASH_WRITE_LEN_BYTE),
(uint32*)w_data,FLASH_WRITE_LEN_BYTE)==0)
{
os_printf("write sector 0x%x ok\n",sector+i);
}
else{
os_printf("Err:write sector 0x%x err\n",sector+i);
}
}
for(i=0;i<cnt;i++){
os_memset(w_data,0x00,FLASH_WRITE_LEN_BYTE);
if(spi_flash_read((sector+i)*(FLASH_WRITE_LEN_BYTE), (uint32*)w_data,FLASH_WRITE_LEN_BYTE)==0)
{
uint32 j=0;
for(j=0;j<FLASH_WRITE_LEN_BYTE;j++){
if(*(w_data+j)!=FLASH_WRITE_CONTENT){
os_printf("Err Flash read w_data[%d]=0x%x\n",j,w_data[j]);
//status=1;
}
if(*(w_data+j)==FLASH_WRITE_CONTENT&&j==FLASH_WRITE_LEN_BYTE-1)
{
os_printf("Sector0x%x Test Ok\n",sector+i);
}
}
}
How to verify whether a flash chip can support QIO or DIO mode?
To verify if a flash chip supports QIO:
- QE (Quad Enable) corresponds to BIT(9) in the flash status register.
- The format of write status register is 01H+StatusReg1+StatusReg2.
- Specific commands should be supported:
- Flash should support EBh command in order to support QIO mode.
- Flash should support 6Bh command in order to support QOUT mode. To verify if a flash chip supports DIO:
Specific commands should be supported:
-
- Flash should support BBh command in order to support DIO mode.
- Flash should support 3Bh command in order to support DOUT mode. Note that ISSI flash can support QIO mode.
Why is some data lost or dropped in transparent transmission mode?
This is because hardware flow control is no enabled. The transparent transmission mode uses TCP protocol, with 1460 bytes (which depends on the protocol stack) of data in every packet. As long as the network is good and the buffer is not consumed, data can be transmitted continuously. In transparent transmission mode, when the interval of time for serials to receive data is over 20 ms, the transmission is assumed to have ended and the received data will be transmitted to the network. So data may be lost if the network connectivity is not good. Please enable flow control to prevent data loss.
How many UART port does ESP8266 have?
Two, UART0 and UART1. UART0 has Tx and Rx pins for data transmission, while UART1 only has Tx for printing debug log. Its Rx pin is occupied by SPI-Flash.
What is the GPIO level status?
Except XPD_DCDC, other GPIOs can be configured to high level.
The GPIO default level status after booting is: except 6 SDIO +GPIO4+GPIO5+GPIO16, all the other GPIOs have internal pull-up resistors. To pull down the GPIOs, external pull-down or inverting circuit is required.
Note: The external voltage level for GPIO cannot be 5V. GPIO4/5 cannot be pulled up with external 1M resistor. Please use 100K resistor instead.

How do I disable log printing upon power-up?
By default, U0TXD will print ROM messages upon start up, which can be disabled for sensitive applications using the UART pin exchange function. Users can call system_uart_swap function to exchange U0TXD and U0RXD with U0RTS (MTDO/ GPIO15) and U0CTS (MTCK/GPIO13) pins. After the exchange, still use U0TXD+U0RXD as the download pin on hardware. Connect MTDO to MCU RXD and MTCK to MCU TXD during communication.
Cloud
What is ESP8266 device life cycle on the Espressif cloud platform?
- Once the master-device-key is downloaded, the ESP8266 device is ready for use.
- The end user can use Airkiss/ESP-TOUCH to connect ESP8266 device to the network. At the same time, the device sends random character token generated by App as the permission identifier. Then the device calls /v1/device/activate and sends token to the cloud.
- The end user uses App, calls /v1/device/authorize interface (by using the random token generated before) and confirms ownership of the device (i.e. becomes the owner and acquires the owner key).
- The ownership of the ESP8266 device is same as the ownership of the device key through which the end user can control the device.
- The end user can call /v1/user/devices to list owned devices and the corresponding device keys.
- As the owner of the device, the end user can call /v1/device/share to share the device with others who can call /v1/device/authorize to get authorization.
Hardware
What are the general power supply requirements of the ESP8266?
Digital voltage requirement: 1.8V - 3.3V
Analog voltage requirement: 3.0V - 3.6V (The lowest possible analog voltage is 2.7V.)
Peak analog circuit current: 350 mA
Peak digital circuit current: 200 mA
Note: CHIP_EN works at 3.0V - 3.6V , please use a level converter to ensure compatibility with digital logic at 1.8V .
What factors must I consider when designing a robust power supply for the ESP8266?
Power supply design for RF circuits is an art in itself and is a large subject. However, here is a small checklist to ensure you include the important components:
- If you are using an LDO regulator, please make sure that the difference between Vin and Vout is sufficiently large for the LDO regulator to operate properly.
- The power rail decoupling capacitor must be located physically close to the ESP8266 and should have a low ESR.
- Please do not directly attach peripherals with 5V logic to the ESP8266.
- If the ESP8266 is being powered from a DC-DC converter, ensure that you follow good practices when designing the converter. Ripple should be filtered with cascaded LC filter stages if necessary.
Why does the ESP8266 draws excess current on power-up and does not boot properly?
The ESP8266 is highly integrated with RF circuits and digital control circuits. When booting, functions such as RF calibration may draw an appreciable amount of power. The maximum analog power (instantaneous) may be considered to be 500mA and the digital circuits may draw a peak current of around 200 mA. The normal operational current is typically around 100 mA, depending on the application and circuit design. Therefore, your design must provide for a voltage regulator that can provide 500 mA without suffering a drop in the output voltage which is outside the operating specifications.
Can I use a LiPo cell or 2xAA cells directly to power the ESP8266?
2xAA batteries can power up the ESP8266. Li-Po cells have a higher voltage swing while discharging and therefore must not be used to power ESP8266 directly.
The ESP8266 contains precision RF circuitry which is affected by temperature or voltage drifts. Directly connecting any RF circuit to an unregulated power source is NOT recommended.
Use of a DC-DC converter or LDO regulator is highly recommended to ensure that the ESP8266 performs as specified.
Is there any specific requirement for powering the SPI flash memory?
The SPI flash memory is an integral part of the system as it stores the user program and data. To ensure compatibility of digital logic, SPI flash voltage should match with the GPIO logic voltage level.
What is the power-up sequence and how is the boot mode determined?
CHIP_EN, the chip enable pin, contains no internal pull-up. It must be pulled externally to a high level to enable the chip. CHIP_EN should be pulled up after or at the same time as VDD33. After 60 ms of CHIP_EN going high, the device will determine the boot mode based on the status of GPIO15 / GPIO0 / GPIO2, and then establish UART communication.
EXT_RSTB: External reset pin. This pin features an internal pull-up and thus defaults to a logic high when left floating. A logic low on this pin will trigger chip reset. The external reset signal should be 0.25 IO + 100 μs. The timing diagram is as shown:

| Description | MIN | MAX | Unit | |
| t1 | The rise-time of VDD33 | 10 | 2000 | μs |
| t2 | The rise-time of EXT_RSTB | 0 | 2 | ms |
| t3 | EXT_RTSB goes high after VDD33 | 0.1 | - | ms |
| t4 | The rise-time of CHIP_EN | 0 | 2 | ms |
| t5 | CHIP_EN goes high after EXT_RSTB | 0.1 | - | ms |
How is the RAM organized on the ESP8266?
The ESP8266 contains IRAM: 64 KB and DRAM: 96 KB.
The IRAM has been divided into 2 blocks: The initial 32 KB stores code that is not marked with ICACHE_FLASH_ATTR (.text). The latter 32 KB is the iCache that stores code marked with ICACHE_FLASH_ATTR.
When Non-OS SDK is used, the initial 80 KB of DRAM is used to store .data/.bss/.rodata/heap and the remaining 16 KB is used for ROM code. When RTOS SDK is used, .data/.bss/.rodata/heap occupy the entire 96 KB.
Protocol
What is the packet size for TCP / UDP transmission?
TCP packet size is 1460 bytes and UDP packet size is 1472 bytes.
System
What is the role of watchdog timer in the ESP8266?
In order to improve the robustness of the system in high interference operating environments, the ESP8266 integrates a two-level watchdog mechanism that includes the software watchdog and the hardware watchdog. By default both the watchdog timers are enabled.
What is the watchdog timeout interval? What happens on a timeout event?
The hardware watchdog interrupt interval is 0.8*2048 ms, that is 1638.4 ms. The interrupt handling interval is 0.8*8192 ms, equal to 6553.6 ms. The interrupt handling interval is the time limit to feed the watchdog after the interrupt occurs. If the interrupt handling interval expires, it will trigger a hardware watchdog reset. As a result, in the cases where there is only hardware watchdog, if a program runs for over 6553.6 ms, then it could cause a hardware watchdog reset. If the program runs for over 8192 ms, then it will invoke a watchdog reset for sure.
The software watchdog is based on MAC timer and task arrangement. The interrupt interval is 1600 ms, so is the interrupt handling interval. As a result, in the cases where there are both software and hardware watchdogs, if a program runs for over 1600 ms, then it could cause a software watchdog reset. If the program runs for over 3200 ms, then it will invoke a watchdog reset for sure.
My application does not really need the watchdog timer, can I disable it?
The current SDK allows disabling the software watchdog only. The following methods can be taken to avoid watchdog reset when user program occupies CPU for too long:
- If your routine needs a time frame of duration between software reset and hardware watchdog reset, you may use system_soft_wdt_stop () to disable the software watchdog. After the program has been executed, you can restart the software watchdog with system_soft_wdt_restart ().
- You may feed the watchdog in between your code by adding system_soft_wdt_feed () such that the watchdog is updated before it issues a reset.
What is the best way to introduce a 10-second delay in my program or poll for an input?
The watchdog timer will not allow endless loops. As mentioned above, the watchdog will overflow and cause reset if the user program is stuck polling for an event for too long or is using loops for delays. We recommend using call-back functions and timer APIs for delay.
For polling an event, if possible, always use interrupts or timer APIs to check often. Most events can be associated with call-back functions within the SDK and therefore polling can be entirely avoided in most cases.
How do I debug memory leak in my Non-OS SDK application?
For Non-OS SDK users, memory leak debugging can be achieved by defining MEMLEAK_DEBUG to enable the debugging function.
Calls to os_malloc, os_zalloc, os_calloc, os_realloc, os_free is recorded and then the API system_print_meminfo() can be used to print heap memory usage.
Steps to debug memory leaks:
1. Modify the main makefile in the project and define DMEMLEAK_DEBUG after CONFIGURATION_DEFINES.
i.e. CONFIGURATION_DEFINES = -DMEMLEAK_DEBUG
2. In user code, such as the user_main.c file, please include the header file “mem.h” and the function:
#include “mem.h"
bool ICACHE_FLASH_ATTR check_memleak_debug_enable ()
{
return MEMLEAK_DEBUG_ENABLE;
}
3. Call system_print_meminfo() API where the cause of memory leakage might possibly be. We recommend using this API at key positions only.
How do I debug memory leak in my RTOS SDK application?
Note: RTOS SDK does not support the same method of memory leak debugging as the Non-OS SDK. Please refer to FreeRTOS documentation for details on memory monitoring and leakage debugging techniques.
How can I track down the cause of a “fatal exception”?
Fatal exceptions can be traced down if you have the assembly file (*.S) that was used to generate the binary. For example, should you encounter an exception when running user1.bin:
Fatal exception (28):
epc1=0x4025bfa6, epc2=0x00000000, epc3=0x00000000,
excvaddr=0x0000000f, depc=0x00000000
In this case, you should inspect 0x4025bfa6 in user1.S to find out the cause of the exception.
When running flash.bin and irom0text.bin, the cause of the exception can be found in eagle.S.
How many timers does the ESP8266 have?
The ESP8266 features a hardware timer and a software timer. The timer accessed by os_timer APIs is the software timer and it does not generate an “interrupt”, it generates a task that can be used to put a normal task on queue. The hardware timer however generates an interrupt which can be used to trigger a certain task. Note that interrupts are not intended for processor intensive tasks.
Are there any specific conditions for implementing timer interrupt routines?
Please refer to ESP8266 Non-OS SDK API Reference and ESP8266 RTOS SDK API Reference (link: espressif.com/en/support/download/documents) for the SDK you are using for details. However, as a general rule, functions declared as ICACHE_FLASH_ATTR must not be called from within a hardware interrupt handler when Non-OS SDK is used. Also, do not occupy the CPU for long when inside an interrupt handler.
How to tweak the transmit power?
The API system_phy_set_max_tpw can be used to set the maximum value of RF TX Power.
We also recommend using the flash download tool to tweak the settings as per your requirements and click GenInitBin to generate esp_init_data_default.bin and then burn it into the SPI Flash.
- LowPowerEn: Set Tx Power for each mode.
- BackOffEn: Reduce the same value of Tx power in each mode.
- PowerLimiten: Set the limitation of maximum Tx power.
- Click GenInitBin to generate esp_init_data_default.bin, and replace the default one.

What is the significance of the “ICACHE_FLASH_ATTR” attribute in the SDK?
For ESP8266_Non-OS SDK:
Functions attributed with ICACHE_FLASH_ATTR are located in the IROM section. They will run from cache when called by CPU. Conversely, functions without ICACHE_FLASH_ATTR are loaded into IRAM upon power- on. Due to limited IRAM, we can not load all the codes into IRAM at one time. So most functions are attributed with ICACHE_FLASH_ATTR and loaded into IROM.
Note: Do not use ICACHE_FLASH_ATTR-functions within an interrupt handler, as it may conflict with the Flash R/W operations.
For ESP8266_RTOS SDK:
Functions are located in the IROM section by default and do not need to be attributed with ICACHE_FLASH_ATTR. Interrupt handlers can also run from IROM. Hence, if functions called frequently need to be run from IRAM, they should be attributed with IRAM_ATTR.
Why do I get compile errors when using IRAM_ATTR in Non-OS SDK?
The default function attribute is IRAM_ATTR in Non-OS SDK. Therefore, if you want the function to reside in IRAM, please leave out the ICACHE_FLASH_ATTR attribution in the function definition/declaration.
Why am I getting compile error: code cannot fit in “irom0_0_seg”?
This means that the code is too large for IROM. Here are some suggestions to resolve the problem:
For SDK_v0.9.5 or later versions:
1. Compile with default configuration to generate eagle.flash.bin and eagle.irom0text.bin.
(1) If the total size of eagle.flash.bin and eagle.irom0text.bin is more than 236 KB, you will need a new Flash chip larger than 512 KB.
(2) If the total size of eagle.flash.bin and eagle.irom0text.bin is less than 236 KB, continue with step 2.
2. Revise the file eagle.app.v6.new.512.app1.ld in SDK/ld as follows:
In the line
rom0_0_seg: org = 0x40201010, len = 0x2B000,
change the value of len according to the size of your eagle.irom0text.bin.
For example, if the size of eagle.irom0text.bin is 179 KB, change the configuration to
irom0_0_seg: org = 0x40201010, len = 0x2D000
3. Now, compile and generate user1.bin by selecting boot_v.1.2+.
PS.
In your source code, load into IRAM functions without “ICACHE_FLASH_ATTR” which can be 32 KB at most; load into IROM functions with "ICACHE_FLASH_ATTR" in irom0_0_seg.
Due to limited RAM, functions in IRAM will be loaded to ram and run upon power-on; functions in IROM will be loaded to cache from Flash and run only if it is called.
Does ESP8266 start user code execution from a regular main routine?
No. The entry point is user_init.
What is the proper method of pointer operations?
Read and write accesses to the RAM must be aligned to the 4-byte (word) boundary, so is pointer conversion. Otherwise, the conversion failure will cause malfunction. For example, please use os_memcpy (memcpy) to convert the pointer instead of float temp = *((float*)data).
What are the differences between RTOS SDK and Non-OS SDK?
The main differences are:
Non-OS SDK
Non-OS SDK uses timers and callbacks as the main way to perform various functions - nested events, functions triggered by certain conditions. Non-OS SDK uses the espconn network interface; users need to develop their software according to the usage rules of the espconn interface. Please consult the SDK guides for more information.
RTOS SDK
- FreeRTOS SDK is based on FreeRTOS , a multi-tasking OS. You can use the standard FreeRTOS interfaces to realize resource management, recycling operations, execution delay, inter-task messaging and synchronization, and other task-oriented process design approaches. For the specifics of interface methods, please refer to the official website of FreeRTOS or the book USING THE FreeRTOS REAL TIME KERNEL-A Practical Guide.
- The network operation interface in RTOS SDK is the standard lwIP API. RTOS SDK provides a package which enables BSD Socket API interface. Users can directly use the socket API to develop software applications; and port other applications from other platforms using socket API to ESP8266, effectively reducing the learning and development cost arising from platform switch.
- RTOS SDK introduces cJSON library whose functions make it easier to parse JSON packets.
- RTOS is compatible with Non-OS SDK in Wi-Fi interfaces, SmartConfig interfaces, Sniffer related interfaces, system interfaces, timer interface, FOTA interfaces and peripheral driver interfaces, but does not support the AT implementation.
Which functions should be called from user_init to avoid malfunction or invalid calls?
- wifi_set_ip_info and wifi_set_macaddr are only valid when called from user_init.
- It is recommended to call system_timer_reinit from user_init, otherwise, all timers need to be armed.
- If wifi_station_set_config is called from user_init, the lower layer will automatically connect to the corresponding router without calling wifi_station_connect.
- wifi_station_set_auto_connect is used to configure the device whether to automatically connect to the saved router upon start up. For example, if the interface is called from user_init with automatic router connection disabled, the device will not automatically connect to the router that time. If the interface is called elsewhere, then the device will not automatically connect to the router next time.
How to wake up ESP8266 from Light-sleep mode using external GPIO or networking events?
In Light-sleep mode, the CPU is suspended and does not respond to signals or interrupts generated from peripherals. Therefore, GPIO signals should be set up to wake the device. The wake up process typically requires less than 3 ms.
wifi_station_disconnect();
wifi_set_opmode(NULL_MODE); // set WiFi mode to null mode
wifi_fpm_set_sleep_type(LIGHT_SLEEP_T);
wifi_fpm_open();
PIN_FUNC_SELECT(PERIPHS_IO_MUX_MTCK_U, FUNC_GPIO13);
gpio_pin_wakeup_enable(13, GPIO_PIN_INTR_LOLEVEL);//Low-level triggered wake-up is recommended!
wifi_fpm_set_wakeup_cb(ssc_fpm_wakup_call);
wifi_fpm_do_sleep(FPM_SLEEP_MAX_TIME);
How to use ESP8266 FRC1 hw_timer?
1. Model:
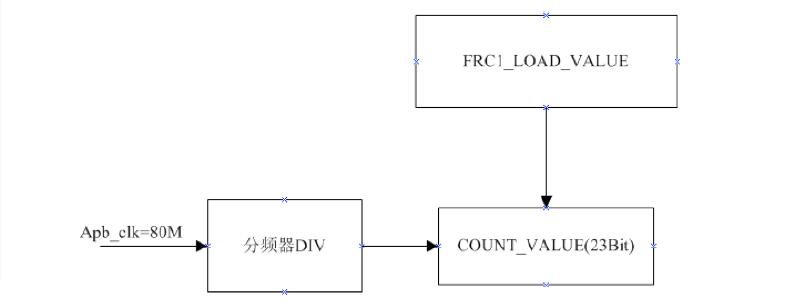
(1) FRC1’s reference clock is 80M. The division factor can be configured to 1, 16 and 256. Difference of division factor will affect the duration of each tick.
(2) FRC1 is a countdown timer. Interrupts will be triggered when the value of COUNT_VALUE decreases to 0. The value of COUNT_VALUE decreases by 1 at every tick.
(3) FRC1 can be configured as auto-feed-mode or non-auto-feed-mode.
Auto-feed-mode: When interrupts are triggered, COUNT_VALUE will automatically take the value of FRC1_LOAD_VALUE and begin the decrement operation.
Non-auto-feed-mode: When interrupts are triggered, COUNT_VALUE will be set to the maximum value, 0x7fffff, and counting begins.
(4) FRC interrupts can be configured as FRC1 interrupt source and NMI interrupt source.
NMI interrupt is an interrupt that can not be masked by CPU. NMI interrupt is LEVEL3 interrupt in ESP8266 while other interrupts are LEVEL1 interrupts. NMI interrupt prevails over any other interrupts lower in priority.
2. Note on SDK HW_TIMER
The division factor of SDK hw-timer is 16, the duration of each tick is 0.2 μs. The parameter of hw_timer_arm can be configured to μs, with a maximum value of 1677000 μs.
How to optimize the memory usage of ESP8266 applications?
Users can optimize memory usage in ESP8266 applications and reduce the memory footprint of applications using the following four methods:
1. Store strings in flash:
(1) Locate some strings into the flash, especially long strings such as HTML requests and response templates.
For example, if a string is originally defined in this manner:
#define test_string "hello world”
you can define it in the following way:
static const char test_string[] ICACHE_RODATA_ATTR = "hello world";
(2) When defining the string constant with the ICACHE_RODATA_ATTR, users must access the content with word-aligned read operations. As the data in the flash needs to be read in multiples of 4 bytes, users can define a macro to acquire the aligned string length:
#define GET_ALIGN_STRING_LEN(str) ((strlen(str) + 3) & ~3)
When using the string, dynamically allocate a new array object to read and store data from the flash. Then use the os_memcpy API to copy the contents:
unsigned int str_len = GET_ALIGN_STRING_LEN(test_string);
char *tmp_string = (char *)os_malloc(str_len);
os_memcpy(tmp_string, test_string, str_len);
(3) Use test_string in your application code. This will also address the issue of exceptions caused in applications by unaligned access to flash memory contents, while reducing the RAM footprint of your application
…….
(4) When the user code is done using the data acquired above, it must free the allocated memory using
os_free(tmp_string);
Note that failure to do so and repeatedly allocating memory will reduce the memory available for core functionalities and may cause malfunction or failure in APIs.
2. Store const data in flash:
(1) Directly load unit32 arrays to flash. For example:
const uint32 array[4] ICACHE_RODATA_ATTR = {0x11111111, 0x22222222, 0x33333333, 0x44444444};
Users can directly use array[0].
(2) But read access of unit8 arrays and unit16 arrays must be aligned to the 4-byte boundary. For example:
const uint8 array[7] ICACHE_RODATA_ATTR = {0x01, 0x02, 0x03, 0x04, 0x05, 0x06, 0x07};
(3) If you need to read the elements in a char array in multiples of byte, try operate with software and read the elements in multiples of 4 bytes, then read one of the bytes according to the offset. Direct read access of array[0] will cause crash.
(4) As for data structure, the common method is to allocate an appropriate amount of memory larger than the size of the data structure you intend to read. Read data in the flash in multiples of 4 bytes and load it to RAM. Use the object pointer in code as usual, as is shown in the first method above. Simply modify the code to read a structure instead of an array.
3. Store debug strings in flash:
Strings printed by the in-built function printf are allocated to RAM by default and take up space. If you do not need to frequently print the log or if the debug string is too long, use the optimized os_printf API to load the debug strings to the flash instead of RAM.
4. Avoid using global variables:
Global variables often take up space unnecessarily throughout the application lifetime. Espressif provides dynamic memory allocation APIs for reducing the usage of global variables. For event-based programming, always use os_malloc and os_free to dynamically allocate space as required. However, we do not recommend frequent allocation/deallocation of varying sizes.
How to speed up connection to an AP after ESP8266 powers on?
After ESP8266 connects to an AP, it will save the AP’s channel information in RTC memory.
-
- When you reset ESP8266 by software or the ESP8266 wakes up from Deep-sleep mode, it will read the AP’s channel information from RTC memory, then try to connect the AP in the channel.
- But if the ESP8266 goes through a power cycle or is hardware reset, the RTC memory will be cleared. The ESP8266 will then scan through all the channels, which takes some time.
You can try the following solution to save and restore the AP’s channel information when you power on or reset ESP8266 by hardware. By doing so, you can avoid the situation where ESP8266 scans all the channels to search the AP it connected to last time. This can help speed up connection time on startup.
- After ESP8266 connects with an AP, use function wifi_get_channel to read current AP’s channel information, then you can save the AP’s channel information in the SPI Flash. Before writing the channel information, you should verify that the channel information is valid.
- When the ESP8266 is then reset by hardware or goes through a power cycle, user firmware can read the saved channel information from flash. By calling WRITE_PERI_REG(0x600011f4, 1 << 16 | channel), the AP’s channel information can be written to the RTC memory. The channel information can be directly accessed from the RTC memory to help speed up connection time.
- Note that the auto connection function should be enabled for the ESP8266 to read the AP’s channel information, and to connect to the AP in that channel.
Only channel information is cached in RTC memory. The other information (such as SSID and Password) is saved in Flash, when you call the function wifi_station_set_config.
Note: If your application requires very frequent hardware resets or goes through frequent power cycles, it is recommended that you use external RTC memory for backing up channel information. Very frequent writes to the flash memory is not recommended as the flash-write cycles are limited.
ESP8266 enters boot mode (2, 7) and hits a watchdog reset. What could be wrong?
Please make sure that when ESP8266 boots, the strapping pins are held in the required logic levels. If externally connected peripherals drive the strapping pins to an inappropriate logic level, the ESP8266 may boot into an inappropriate mode of operation. In the absence of a valid program, the watchdog timer may then reset the chip.
As good design practice, it is recommended that the strapping pins be used to interface to inputs of high-impedance external devices only, which do not force the strapping pins high/low during power-up.
What does the ESP8266 boot mode information printed on power-up signify? How can the boot mode be changed?
The ESP8266 evaluates the status of the boot strapping pins on power-up and decides which mode to boot into. Here is an example of ESP8266 boot mode information printed on power-up:
| ets Jan 8 2013,rst cause:1, boot mode:(3,2) |
The first digit (3) of boot mode represents the current boot mode of ESP8266. As the table below shows, the boot mode is determined by the 3-bit value represented by the strapping pins: [GPIO15, GPIO0, GPIO2].
| 3-Bit Value of the Strapping Pins / [GPIO15,GPIO0,GPIO2] | Boot Mode |
| 7 / [1,1,1] | SDIO HighSpeed V2 IO |
| 6 / [1,1,0] | SDIO LowSpeed V1 IO |
| 5 / [1,0,1] | SDIO HighSpeed V1 IO |
| 4 / [1,0,0] | SDIO LowSpeed V2 IO |
| 3 / [0,1,1] | Flash Boot |
| 2 / [0,1,0] | Jump Boot |
| 1 / [0,0,1] | UART Boot |
| 0 / [0,0,0] | Remapping |
Tool
How to download firmware to Flash in development phase and mass production phase?
In the development phase:
The Flash memory can be programmed by connecting the ESP8266 to the computer using a UART link. This can be achieved with a USB-UART converter for PCs that no longer have serial ports available externally. For instructions on how to use the Espressif official Flash download tool, please refer to the document ESP8266 SDK Getting Started Guide.
Download tool: http://espressif.com/zh-hans/support/download/other-tools
Download method: http://espressif.com/zh-hans/support/download/documents
For mass production phase:
If it is not convenient to program the ESP8266 for mass production using the UART interface, the process can be made faster by directly programming the Flash chips using the Flash manufacturer’s programming tools.
To generate a binary file that can be written to the Flash before board assembly, please use the Espressif Flash download tool to generate a combined Flash file. Make sure you configure the Flash size and memory map correctly before generating the combined binary image.
Wi-Fi
Why problem happens during connecting to router with IP 192.168.4.X in SoftAP + Station mode?
Default IP address of ESP8266 SoftAP is 192.168.4.1.
The ESP8266 cannot distinguish if the IP address of the SoftAP and the Station are both in the same subnet, in this case, 192.168.4.x. Sorry for the inconvenience.
Cannot find router - connection failed, but I do have my router configured correctly. What could be wrong?
Assuming you have filled in the SSID correctly, this could happen due to two possible reasons.
- The first being use of non-standard characters in the SSID name. We highly recommend using standard characters only, such as English alphabets and numbers.
- The second and more probable cause is bssid_set parameter. Please set stationConf.bssid_set = 0 if you wish to connect to a router whose MAC address need not be specified.
Why are there network connectivity and packet loss problems in ESP8266 SoftAP + Station mode?
ESP8266 does support SoftAP + Station co-existing mode, however, ESP8266 has only one hardware channel which is shared between the Station interface and the SoftAP interface. As a result, ESP8266 SoftAP will dynamically adjust the channel value to be consistent with ESP8266 Station, which may cause the following cases.
Case 1
- ESP8266 Station is connected to a router (assume the channel number is 6);
- ESP8266 SoftAP mode is activated using wifi_softap_set_config;
- The API will return true if configuration is correct, but the channel number will adjust automatically to be the same as that of the ESP8266 Station interface (which is 6 in this case).
Case 2
- wifi_softap_set_config is called and ESP8266 is configured to SoftAP mode (assume the channel number is 5);
- Other stations are connected to ESP8266 SoftAP;
- ESP8266 Station is connected to the router (assume the router channel number is 6);
- ESP8266 SoftAP will automatically adjust the channel number to be the same as that of the ESP8266 Station (6 in this case);
- As the channel changed, the station that is connected to the ESP8266 SoftAP will lose Wi-Fi connectivity.
Case 3
- Other stations are connected to the ESP8266 SoftAP.
- If ESP8266 Station keeps trying to scan for or connect to a router, ESP8266 SoftAP may lose connectivity, and UDP or ping packet loss may occur.
This is because ESP8266 Station will scan through channels to find the target router. Therefore, ESP8266 SoftAP keeps changing channel as well, leading to connectivity problems.
In such case, users can set the timer and call wifi_station_disconnect on expiry to stop ESP8266 Station from trying to connect to the router. The other way is to call wifi_station_set_reconnect_policy and wifi_station_set_auto_connect at the beginning of the configuration to prohibit ESP8266 Station from reconnecting to the router.
What is the “channel” setting for Wi-Fi? Can I select any channel of my choice?
In this case, a channel refers to a specific frequency channel within the allowable range of frequencies allocated for use by Wi-Fi systems. Technically, you may use any channel of your choice. However, certain channels could be illegal in your country!
Please consult our document ESP8266 Wi-Fi Channel Selection Guidelines for more on how to select the best channel for your application.
How to configure ESP8266 to connect it to wireless router?
There are the following methods to connect ESP8266 device to wireless router:
- Enable ESP8266 Smartconfig. ESP8266 device can scan attribute packets in sniffer mode and connect to the router.
- Enable SoftAP mode for ESP8266 device to connect to smart phone and establish stable TCP/UDP connection. Then the smart phone can send SSID and password.
- Enable WPS configuration, which requires adding buttons to ESP8266 device or using the mobile app to control WPS after connecting the device to SoftAP.
ESP8266 SoftAP SSID and password modification does not actually take effect when calling wifi_softap_set_config(), even though the function returns successfully. What could be wrong?
Configuration changes made to ESP8266 SoftAP by calling wifi_softap_set_config() may sometimes fail to take effect if the API is called inside a callback function. Situations like this may arise when, for example, an application tries to switch to Station mode from SoftAP mode from inside a callback function attached to the SoftAP events.
To make sure that the modification made by wifi_softap_set_config() immediately take effect, please use the system_os_task() API to create a task that alters SoftAP settings. Also, make sure that the ESP8266 has successfully switched to SoftAP mode before any SoftAP APIs are called. For example:
|
LOCAL void ICACHE_FLASH_ATTR some_callback_function (void) { unsigned char res; os_event_t *testQueue;
res = wifi_set_opmode_current (0x02); // Make sure ESP8266 is in SoftAP mode! os_printf ("\r\nSet op mode returned: %d", res);
testQueue = (os_event_t *)os_malloc(sizeof(os_event_t)*4); system_os_task (set_ap_config, USER_TASK_PRIO_1, testQueue, 4);
ap_server_setup (AP_PORT); // Continue with server setup, etc } void set_ap_config (os_event_t *e) { struct softap_config ap;
wifi_softap_get_config(&ap); // Get config first.
os_memset(ap.ssid, 0, 32); os_memset(ap.password, 0, 64);
os_memcpy(ap.ssid, "SSIDhere", 8); os_memcpy(ap.password, "PASSWDhere", 10);
ap.authmode = AUTH_WPA2_PSK; ap.ssid_len = 0; // or its actual length ap.max_connection = 1; // Max no. of stations permissible? wifi_softap_set_config (&ap); // Update ESP8266 softap config! } |
AT
Found 2 results
- Collapse all
- Expand all
| Title | Body | Platform | Version |
Release Date |
Download |
|---|---|---|---|---|---|
|
ESP8266 IDF AT Bin
|
Bin | Latest | 2020.07.29 | ||
|
ESP8266 Qcloud IoT AT
|
Based on ESP8266 QCloud AT Command. |
Bin | Latest | 2019.08.19 |
